
Did you know that soaking your grains and flours prior to using them helps make them more digestible and soft? This is especially wonderful for my family, as we’ve found that our freshly ground grain can sometimes taste a little chewy if it has not been soaked before being made into dough. There’s quite an improved taste when your wheat flour has been soaked first!
This recipe is adapted from one in the Whole Grain Breads book by Peter Reinhart. I’ve tweaked the recipe a bit to make it more friendly for my own kitchen and our tastes. I also used hard white wheat.
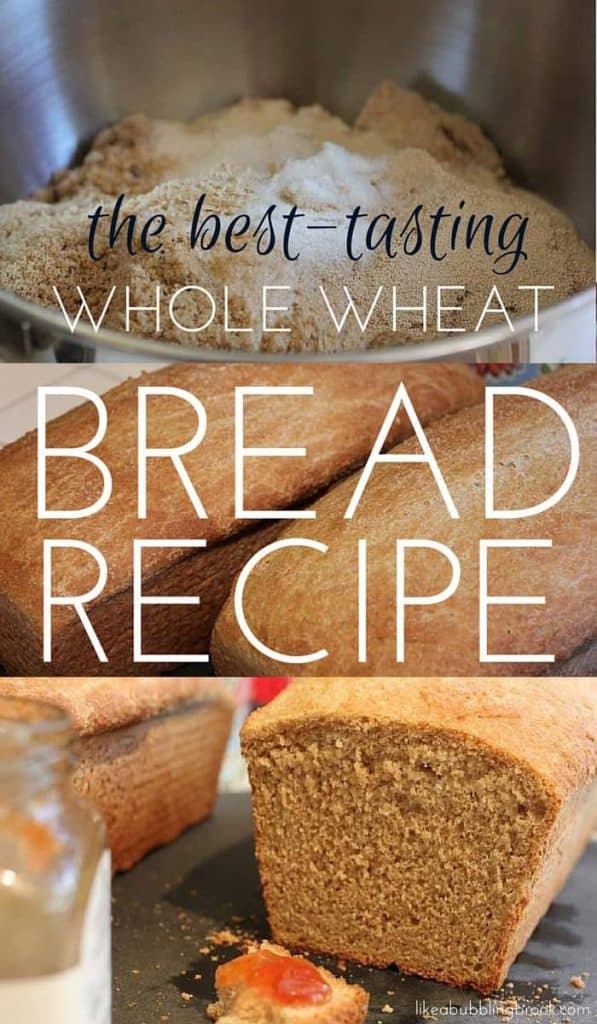
If you are grinding your own wheat, you will want at least 4 cups of flour ready; 3 1/2 for soaking, and another 1/2 cup or so for adding to the final dough the next day.
Finally, once you’ve gotten familiar with making this bread, you might want to consider doubling or tripling the recipe so that you can keep some sliced and stored in your freezer for future use. Lightly toast however many slices you need as you need them. They’re great for sandwiches, snacks, or with a bowl of hearty soup.
Here’s what to do:
The night before you plan to bake…
First, mix 1 3/4 cups of whole wheat flour, 1/2 tsp salt, 3/4 cup milk, and 2 tbsp whey if you have it (otherwise milk or yogurt is sufficient) in a bowl. Stir for a minute or so and cover. Set aside; you’ll be letting this sit out overnight (do not refrigerate).
Second, mix 1 3/4 cups whole wheat flour, 1/4 tsp instant yeast, and 3/4 cup of filtered water. Form a ball of dough, and, using wet hands, knead it in the bowl for about two minutes. It should feel a little “tacky” but not necessarily sticky. Let the dough rest for five minutes, then knead it for one more minute. Move it into a clean bowl and cover. Refrigerate this one overnight.
The next morning, remove this pre-dough from the refrigerator and let it sit out for about two hours.
Now you are ready to begin making the final dough.
Chop both pre-doughs into 10 or 12 smaller pieces. Sprinkle flour on them to keep them from sticking too much. Combine them in a large bowl with:
1/2 tsp salt
2 1/4 tsp instant yeast
3 tbsp brown sugar
1 tbsp melted butter
Knead in the bowl with wet hands until all the ingredients are evenly integrated into the dough. If the dough is too wet, add more flour. You may also use a large stand mixer with a dough hook rather than your hands.

Dust a work area or large cutting board with flour, and knead the dough for 3 or 4 minutes, adding a little more flour if needed. The dough should feel soft and a little tacky, but not sticky. Make a ball with the dough and let it rest for about 5 minutes.
Prepare a clean, lightly oiled bowl. Knead the dough for one more minute, then form it into a ball again and place it into the oiled bowl. Cover loosely and let rise for about one hour.
Transfer the dough back to your work area and form it into the shape of your 4×8 loaf pan. Put it into the pan, cover loosely, and let sit for another hour. It should rise above the pan.
Meanwhile, preheat the oven to 425F. When the dough is ready to bake, brush just a little bit of olive oil over the top and put it into the oven.
Lower the temperature to 350F and bake for 20 minutes. Turn the loaf 180 degrees and bake for another 20 to 30 minutes, until golden.
Place bread on a cooling rack and let rest for an hour before devouring!


sounds good! I've been trying convert my read recipe to soak it but so far I haven't had much success.It always out too dense. Next time I make bread I'll try yours!
Beautiful loaf of bread!
I'm so glad you shared this, I can't wait to try to make bread like this. I use a combination of hard red and soft white. And I'm so glad to see that you use just the basic ingredients. I have friends who add so many other things to their homemade bread that it really isn't that cost effective. I've never used a lot of the additives they use, and our bread seems to be fine.
I do think my husband would like this a little better, he doesn't like heavy bread.
Thank you so much for sharing!
Yay! Just looked at your bagel recipe and have been converting all my recipes to grind and soak my grains. Glad to have one that has been tried. =0) thanks!
This sounds great! We're gonna make this for the family this week. Thanks for sharing 🙂
Great recipe! This made a very good bread and will use again soon!
Ashley
Discovered this recipe last week. I have been experimenting with different wholewheat recipes but none have suited the whole family until this one. It’s goes down a treat. Just finished baking 2 loaves & dd2 (who is a very fussy eater & won’t touch bread) is sitting at the table eating a warm slice from the oven 🙂 Thanks
I’m so glad!!!! Thank you for coming back to share such sweet words!
I’ve been looking for a soaked bread recipe! This one looks great!
I find myself bookmarking so many of your posts…. 🙂 Thank you!
I’m so glad! 🙂
Am really looking forward to making this bread! Am wondering if I can just use regular yeast instead of instant? Thanks!
Yes, Beth, you can. I use regular yeast… just mix it with a tad bit of lukewarm water before adding it to the rest of the ingredients. Hope that helps!
Thank you….will be trying this tonight 😀
thank you for this recipe! i have been battling with making bread like this simply because I am not sure where to get flour like you are talking about. Will “whole wheat” flour from the grocery store work? or do you buy something special? and do you ever add other grains or nuts to your bread?
THANKS!
Tascha, we add other grains and nuts, but not to this particular recipe. If you click on my “cooking” link in the menu bar, it will take you to my recipe index, and I have other breads there, too. You might like the cinnamon raisin walnut bread recipe 🙂
These recipes work best with freshly ground wheat (from the kernel stage, not ground into flour yet), but you can modify them with the ww flour from the grocery if you don’t have a grain grinder. It won’t taste quite the same, and won’t have the same nutrient value (the nutrients die/weaken as the flour sits on the shelf, and the flour can go rancid easily) but it’s still better than highly processed, white flour. Practice with the ww flour from the grocery, just don’t soak it first — because when we soak, we are soaking the whole grain before it is ground into flour, not the flour itself. Does that make sense?
Once you get the hang of it, I would begin a small savings fund for a grain grinder, and begin searching Craigslist or internet sales.
Hope that helps a little! It’s a much healthier — and tastier! — way to enjoy bread.
THANKS! I don’t have a grinder…. not even sure where I would get wheat kernals. lol. but I will be switching to ww flour… we have actually been limiting our “white carb” intake recently-so this fits right in!
You can get the wheat kernels at health food stores, Whole Foods, specialty groceries with bulk bins, or Azure Standard. And —- drumroll, please —- some Walmarts are carrying them now, too! The brand is Prairie Gold hard white wheat, if I remember correctly, and it’s typically stocked on the bottom shelf of the baking aisle. Good luck to you! xoxo
I am confused by the soaking/not soaking comment. If I grind my own wheat into flour before baking I do this the night before?:
“First, mix 1 3/4 cups of whole wheat flour, 1/2 tsp salt, 3/4 cup milk, and 2 tbsp whey if you have it (otherwise milk or yogurt is sufficient) in a bowl. Stir for a minute or so and cover. Set aside; you’ll be letting this sit out overnight (do not refrigerate).”
But if I get WW Flour from the store I skip that part? Did I read that right? When are those ingredients incorporated then?
Julia, if you get the ww flour from the store or grind it fresh before you begin, it’s still just as the recipe says. Use the 1 3/4 cups of your store bought ww flour OR 1 3/4 cups freshly ground flour. You use it the same. Hope that helps!
Jaime, you wrote: “because when we soak, we are soaking the whole grain before it is ground into flour, not the flour itself.”
Now I’m confused…I thought you ground the wheat in to flour -then- soaked it…
Thank you for clarifying…
Karen, I really did a doozy on that comment didn’t I? Oh my. You soak the FLOUR, not the grain; you’re right. Sorry for the contradiction in that reply… not sure what I was trying to say there. Must be mommy-brain 🙂 Please forgive me!
Your bread looks good. How would you describe the taste and texture?